
Optimizing your recovery following ACL surgery is our goal. Click through the following links for information to facilitate that recovery. If you have any questions, do not hesitate to reach out to your healthcare team.
- Straight Leg Lift
- Exercises
- Running Progression
- Tracking Heel Height
Straight Leg Lift Test:
Dr. X recommends all of his patients to start attempting a ‘Straight Leg Lift Test’ the day following surgery to help with recovery.
Be sure to record when you are able to do a straight leg lift in your Patient Journal.
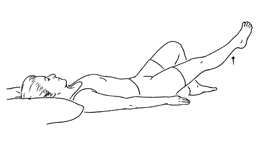
How to do it?
With your leg resting on your bed or a flat surface, pull your toes back, push the back of your knee into the bed, tighten your quad and then lift your heal off the bed.
When to do it?
Begin attempting the straight leg lift test on the day after surgery.
How often to do it?
Starting the day after surgery, attempt the straight leg lift test three times each day, once at breakfast, once at lunch, and once at dinner.
When to record results?
A positive test consists of successfully lifting your heal off of the bed. Please record the first date and time you are able to do this, after surgery, in the post-op journal or the fuse: Post-Op Journal app.
Rehabilitation Exercises:
These exercises are the same ones that were recommended prior to surgery with the addition of exercise 4: Extension with Over Pressure.
Advice from Dr. X:
When you hurt your ACL, it’s very important to get your motion back immediately. Without your motion, we can’t get your strength back. Often, you’ll go to the ER – they’ll put you in a knee immobilizer, and tell you to go see someone.Take that immobilizer off, and get that quad to fire with full-extension and get your motion back.
Exercise 1: Prone Hang
After an ACL injury, we need to get the injured knee straight. Without getting it straight, you can’t fire the muscle. This should be the top priority.
This should be your first exercise: the prone hang.
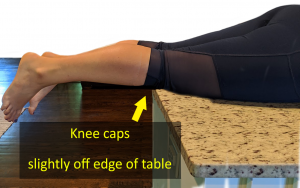
Lay down on a bed or table with your kneecaps off the edge. You may notice the heel on your injured leg is above the heel on the healthy leg. This is what you are working to correct.
While laying off the bed, gravity will work to help stretch the leg. Lay like this for ~20 minutes and your hamstring should relax. If you need more pressure, you can place the uninjured foot on top of the ankle of the injured leg. This will provide additional force to help straighten out that injured leg.
Recommendation: Prone Hang for 20 minutes 2-3 times a day.
Exercise 2: Short Arc Quad
After ACL injury it is important to immediately work on getting the quad to function.
To do this exercise, place your finger on the VMO (vastus medialis oblique). Pull your foot back and tighten your quad. Your finger should get pushed back from your muscle contracting when performed properly. Compare this to your uninjured leg, it should feel the same.
Once you can do that, we need to work on short arc quads. Place a cushion or pillow under your knee. Pull your toes back again, place your finger in the same location as before, and straighten your leg all the way out until the quad squeezes. The leg should not be lifted bent (from the hip), but instead should be extended from the knee.
Recommendation: Do 5-10 short arc quad repetitions, 2-4 times a day, immediately after you get hurt.
Exercise 3: Active Assisted Flexion
After ACL injury, we also need to regain the bending of the knee. Once you can get the knee at about 95 – 100°, you can get on a stationary bike for further rehab.
For this exercise, while sitting on a table (end of the couch, chair, etc.), you’ll notice that the injured leg will not bend all the way. Take your good leg, place it on top of the injured leg and push back to bend the injured knee. Hold it for ~5 seconds and repeat.
Recommendation: Do 10 repetitions holding for five seconds on each rep, 2-3 times a day. °
Exercise 4: Extension with Over Pressure
Place one hand where the small cut on the front of your knee is, lock your elbow and push down. With the other hand placed on your ankle pull up.
Recommendation: Do 4 sets for 20 seconds at least 3 times a day.
Running Progression:
You may start jogging when cleared by your doctor (around 3 months post-op)
Expect to be sore and to notice swelling for a few days when first increasing your activity. Feel free to ice and take naproxen as needed.
How often can I jog?
Start by jogging no more than 2 days per week. You should have at least one day of rest between jogging sessions.
How should I begin jogging?
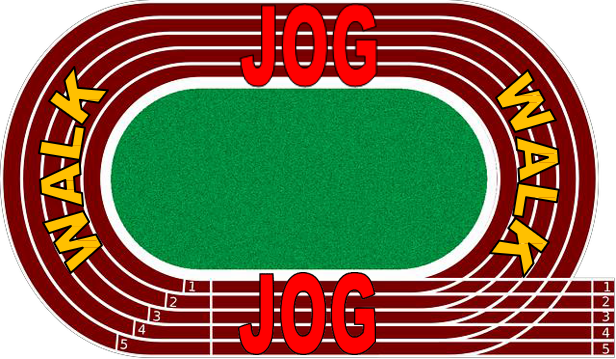
Jog the straights of a track and walk the curves for 8 laps (or 2 miles). Increase your distance each time you attempt jogging. Build up to where you can jog 8 consecutive laps without stopping over the next 4-6 weeks.
What should I do on my off days?
We encourage you to cross train on a stationary bike or swim in a pool on your off days.
When can I start sprinting?
When able to jog 2 miles, you may then start sprinting (around 4.5-5 months after your ACL reconstruction).
What's the best way to get back into sprints?
Start by accelerating for 10-15 yards, sprint for 10-15 yards, and decelerate for 10-15 yards. DO NOT ABRUPTLY STOP OR STOP QUICKLY! Build up to 10 sprint intervals.
Do not complete any hard cutting activities until 6 months or cleared to do so by your doctor.
Tracking Heel Height Difference:
Measuring heel height difference is a test that we typically do when you come into our office to measure your recovery after surgery. We now have a way that you can measure and track your success from the comfort of your own home using a smart phone camera.
Need:
2 coins, scotch tape, a smartphone with camera, and a family member or friend to aid in this measurement.
Step 1:
Remove shoes and socks.
Step 2:
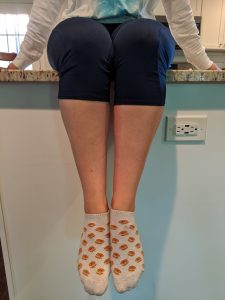
Lie on your belly on a hard surface (table, counter, etc.) with your knee caps completely off the edge of table, and lower legs hanging off table.
Step 3:
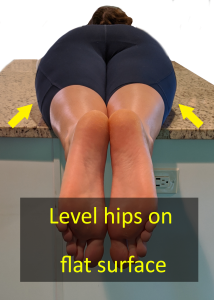
Level out your hips so they are even (roll from side to side to adjust).
Step 4:
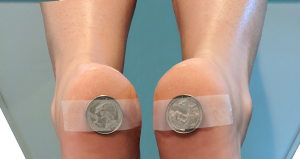
Have your helper, tape a quarter to the bottom side of each of your heels. Try and place the coin on the same spot on each foot.
Step 5:
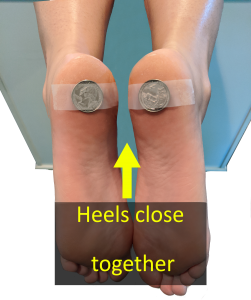
With your heels close together (but not touching), take a picture with camera facing the bottom (sole) of your feet (NOT from the side). Make sure the picture is straight on – try to avoid any angles or tilt.
Step 7:
Upload the picture using the form below. We will take it from there!